Monday, January 14, 2019

Updating from September 2018... Bulwarks

 My best buddy sidelined things for a little while, as life will, as we had to spend 14 weeks of surgery, rehab, revision surgery then more rehab to repair her knee.  Her name is Gracie and shes a very special girl.  She's the Nanny dog to my two granddaughters and a top-notch sock thief.  It wasn't easy on any of us and we spent 3 months sleeping in the living room on an air mattress next to her crate as she very slowly got better.  Thanks to the surgical center at Coastal Ortho and to Georgia and her wonderful crew at Fetch Canine for their focused rehab and the lovin' they gave Gracie.


Bulwarks - Let's start with Stanchions... about mid September 2018


Sometimes we get lucky.  The local HD stocks Douglas Fir 4x4's.  That's a big deal in Yellow Pine country.  I would have taken Yellow Pine, love it, but treated would have been a tough chore to pick through.  I milled these down to 3" x 3" because the frames are 1-1/2" and somehow I thought that it would be good that it was a multiple of that.  Not sure why I did but it seemed right and thought it may pay off making things fit better later.

I basically squared the Bulwark stanchions off the floor timbers and marked the angle as they fell across the frames.  I used lags to secure them.  Ceramic coated lags that I'll slather the heads with epoxy before final paint if not buried behind other subsequent timbers.  All of this under a canopy yet to be constructed.


The scantlings are heavy I know.  I intend that they be.  This is a slow cruiser.  She'll do hull speed and that's it.  I have a 9.9 Suzuki Hi-Thrust (same displacement as the 20HP but choked down to a max 4500RPM) so I think that it'll do all it needs without much waste.


The bulwarks themselves are 3/4" pine that is sprung to the stanchions and screwed in place.
At this point I had lowered the floor and removed the raised floor timbers.  Those are seen standing in one of the photos here.  


The inside of the bulwark is lined with pine that has been chamfered and hot dip galv nailed in place.  By the way... I used a DuoFast siding nail gun for this.  I used it primarily because the DuoFast brand of hot dipped, ring-shanked coil nails are some of the best, most corrosion resistant gun nails I've ever used.  I found this watching them weather (or not weather) for the past 10 years at our Rome farm before we moved.  I thought... "why not?"


At the fore end of the bulwark I decided to build a little curve into this.  It actually evolved a little further (as you will see) as I started thinking about the boat's helm which I am building as far forward as I can for visibility.


 I also made a few "slack-belt" hand sanders to smooth out the curves that were basically built of segments, like barrel staves.

The inner ceiling, as the lining is sometimes called, stops about here for now.  Benches will lay over these so I didn't want to waste material to just be covered back up.

White oak was again used as a bulwark cap.  I just used a nice straight joint and the boards were wide enough (and the run gentle enough) that I only needed one joint midway.


I'll state this now as some of you may have reservations about my using smaller strips with obvious joints between to be caulked as they open... 

I know, going in, that this is a wooden boat.
Wooden boats, like all boats, require maintenance to seal the seams, protect the wood and prevent nature's course. 

I also know this about myself... I like building them and messing with them as much as using them.  

I know that maintenance will be ongoing and this boat (as well as others to come) will have its share.  I gladly accept and welcome this with a smile and a lighter heart for the joy in it.  

She is a living, changing thing to me... a pet, my responsibility to keep "healthy".

 - Mike

Time for an Update...

Hello all.... anybody out there?  My blog has gone dormant but the project is far from it.  It swung a little sideways for a while but, reviewing the last post, the project has tracked pretty close to where I left the faithful...
Circa - June 2018... 
I won't spend a lot of time and post recounting the decision to spread my shop into what was a boat shed, but it was a wise decision.  I found myself fighting the weather (or anticipation of it) and always either stopping too early for a squall that never materialized or having to madly dash outside on one of those 0% chance of rain coastal Georgia days covering everything as rain pelted down.  I did install (at the recommendation of a co-worker and friend (thanks Bo) LED UFO high bay lights that have been great.  This involved hand digging a trench from the house to the shed with shovel and laying PVC conduit.  Love the lights and the decision to put everything in the shed with just a few tools and materials left in the garage.  I will say that mildew is an issue down here and spraying bleach water is part of life.  I opted to stop with spending money on the shed and instead spend it on the boat, so, the shed is open and rain will blow.  Its not bad in the summer though.  It isn't stagnant and I'm not sure that the right idea in the deep south might not be to build an over sized canopy and work in the middle of it.

Okay, rolling back to April 2018 I started getting the new white oak decks in.  The idea is to bed them in PL Roof polyurethane and create a wider deck that will have a 2" un-manilla rope rubrail.


So far I really like the PL S30.  It is tough, really tough, and sticks like crazy.  I have torn out "bad ideas" bedded in this and it has to be cut out.  I didn't want to install a sprung deck so I used a scarf joint and worked my way around the curves.  Just a jigsaw and sander.


The procedure was to layout the shape using a template, cut the next board  a set distance previously marked along the deck and  lay that on top.  Then, with a sharp No #2 Ticonderoga I marked the shape of the next board and cut and sanded that to match.


I used a similar thickness board to transfer the shape accurately.


The joints are fairly tight.  They are beveled slightly with a chamfer bit in a router  so that caulking (more PL 30 ) can seal the seam.  The PL states that fully cured, it is paintable.  We will see... I plan to epoxy coat the white oak with CPES and then may just paint.  I could skip the CPES altogether with the paint but a few of the boards could use a little stabilization.


Note the floor timbers for the initial self draining deck plan


Note this (and you know how things are liable to change) but I really grappled with the idea of providing a self draining deck.  I liked the idea but I could not make the idea work in such a small boat and worried about stability or, at least, perceived motion setting up that high.  I was probably silly but they were eventually lowered.


One thing that REALLY bothered me about the self draining deck was that it needed to be sealed.  I hated that idea.  I could imagine water or vapor finding its way in there and creating a nasty mess. I did not want to have sealing hatches or a big fiberglass slab for a deck.  I considered using some sort of floor covering but everything seemed anachronistic, and in a big, obvious way.
What was the biggest challenge here?  Removing the 22 drum liner bags of 2 part foam.  The more I read about this, the more I hated the idea of it being on the boat.  The only place I still have it is the engine well area. That seemed like the most well sealed and beneficial area to leave alone structurally.  I am not required to have flotation foam per USCG regulations but I am probably going to incorporate EPS foam along the underside of the deck behind the benches.

Forepeak Deck... August and September 2018


The forepeak was handled in the same manner as the deck.  Lots of PL and screws.  You probably see those bulwarks in place so I'll get to them in the next post.  This is a little out of sequence, but it made more sense to include it with the deck.


Tuesday, March 13, 2018

Well, I promised some changes... ahem.


First the pictures.  They speak for themselves. 


A sawzall and shovel did most of the work.  The fine work was accomplished with a variety of flush cut saws, multi-tool, crowbars, hammer and chisels... basically whatever worked.  The foam is itchy but easy to get out dry.  


The Plan (Updated)...

The first round of the evolution
The future plans call for a much more "themed" boat.  
This, as I stated previously, is a pure pleasure craft for sightseeing and picnicking. The "theming" has gone to a new level.  I want this to be something my grand-girls remember with layers of detail that keep you looking and exploring.  My daughter gets credit for the name and our kind of going "Disney" nuts this past year has pushed this far further into the realm of fantasy in some regards.
My ride on the Disney Motor Launch sort of started it.  While tooling across the Seven Seas Lagoon last September, I decided that this was it.  My own "Steam Launch" inspired conveyance!  I began down the classic route of candy striped awnings and varnished brightwork with the hint of Disney's Jungle Cruise boats starting to creep into the design.  This was mostly in the steam boiler becoming a workable engine well for the outboard.  I tried other arrangements for this faux boiler or uses of and it really didn't seem practical.  I looked at a possible ice chest but it seemed like I was trying too hard.  Staying with the uses on the motor launch and even the them park boat, an engine cover made sense.  
The African Queen is the original vessel from director John Huston’s classic 1951 film by the same name. Photos by Andy Newman/Florida Keys News Bureau

One Step Further...


I then began to look hard at the original inspiration for the Jungle Cruise ride.... The African Queen.
The fact that the Original African Queen still exists is amazing enough, but what is more interesting is that the restoration has attempted to capture the look of what people hold dear from the movie and it is that detail that transports people, for a moment.  As I read more about what Walt Disney attempted in his park (and served as inspiration for Disney World after his death) I realized that it was this aspect of the build that I wanted most.  I wanted for my passengers to crawl over the boat, looking for detail and to always ask, "How old is this?"  I got a little of that in Miss Addy's state when she was wrapped before the move and I liked it.  It fooled people and I wanted to take that further.  as Walt would say, I wanted to "plus it"!


So how?
The entire boat will look as if its purpose has nothing to do with hauling people.  This is a river boat, of the Amazon or Blue Nile variety,  Something that would have steamed out of Zanzibar at the turn of the century to deliver goods and maybe a traveler or two.  She will look work with scrub planed white oak deck and gratings.  Nothing gleaming, nothing bright. 
The seating will be cargo boxes and stacked steamer trunks whose lids open to reveal usable storage space finished clean and serviceable, only an exterior illusion.  Old travel stickers and warnings will festoon this cargo.  Want a seat?  Find a crate to sit on.  Want a cold drink?  Check the steamer trunk.
I plan to use burlap coffee bean sacks as cushioned seats on the trunks. Hey, can't rough it too much and the folks down river need their coffee!


The helm is a genuine wine barrel (again cargo).  Manila rope lashes things together and down (even when they don't).  The idea is to make as complete an illusion as possible but keep it serviceable and safe.  She should look old and worn but only look that way.
I have something special planned for the canopy frame.  I want the look of a lashed bamboo frame but the durability of an aluminum frame.  I will use the same techniques used to produce faux bamboo but use welded aluminum schedule 40 pipe instead.  Welding rings as the bamboo nodes, blending the weld fillets and painting techniques should have people wondering.  The "joints" will be lashed with manila cordage. 
The ideas are still evolving but for now, I have gutted her to the frames which will remain exposed and am down to the final removal for the boiler engine well. 


I have 200 board feet of white oak piled in the garage and a new welder with spool gun ready to transform aluminum to bamboo.  Wish me luck!

Saturday, May 27, 2017

Major Changes!

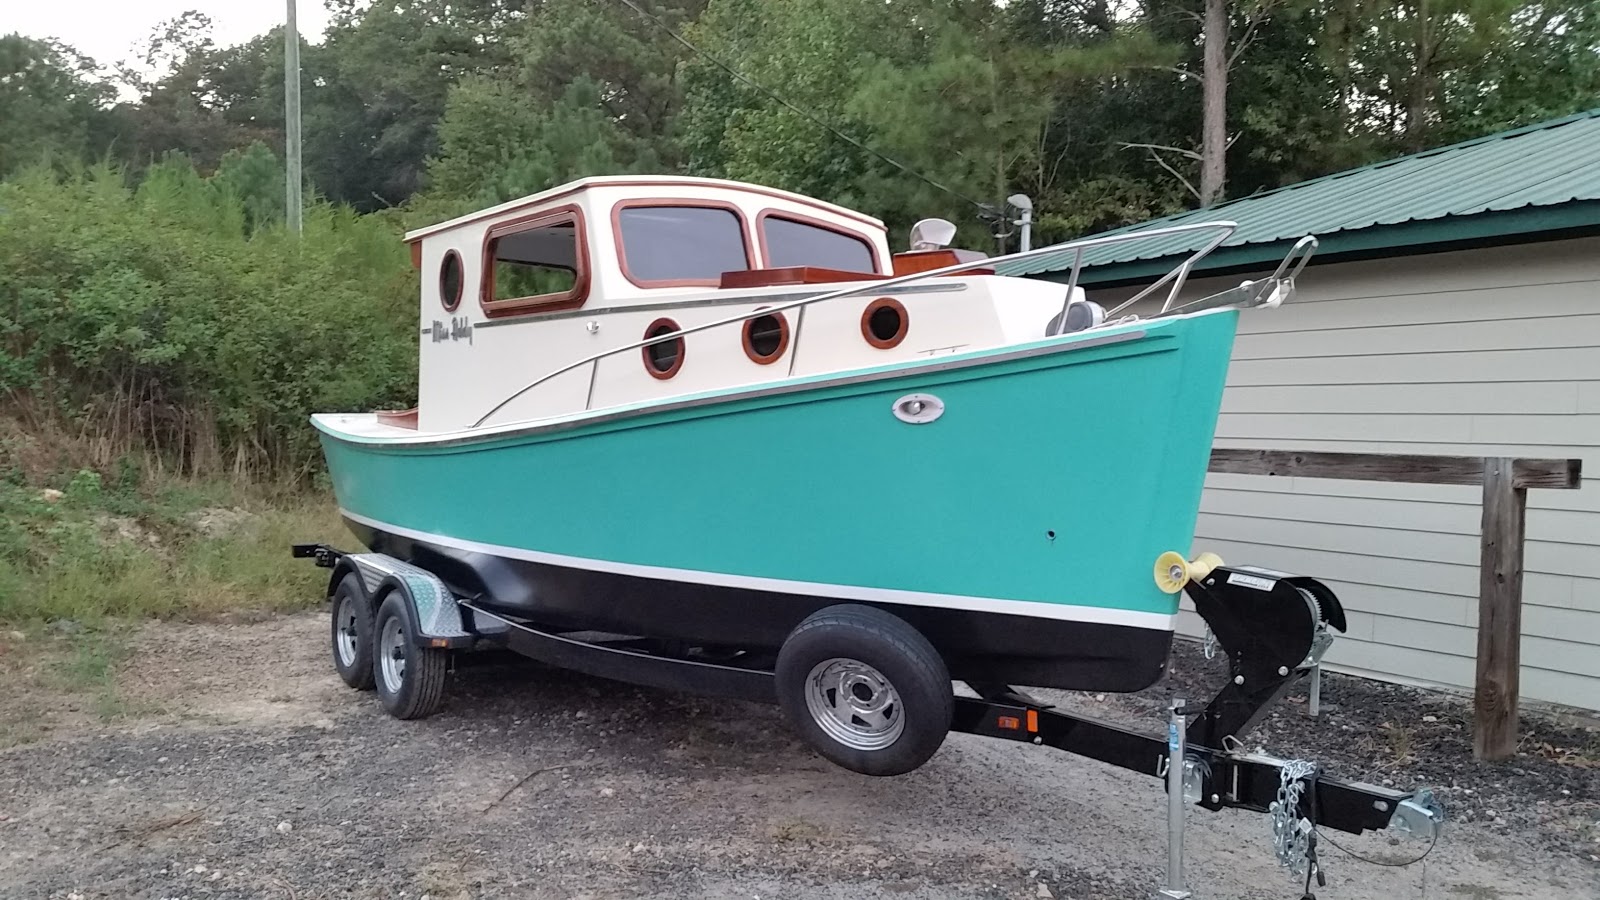
Well, its been a while...

Hello again from the coast.  We have settled in and although there is more do around the house than I care to mess with I am ready to press on and finish Addy, but I wasn't until now.
At the risk of criticism and insult, I am changing direction with Miss Addy.  She is going to be reborn a launch.  Off with her gigantic pilothouse.  She will be opened up and topped with a full awning, scalloped edges and all.  
Rendering of Miss Addy as a Launch.  the old cockpit becomes
the raised helm and a full awning stretches the length of the launch.
Anchor bow roller  and winch are left intact.
This picnic boat gets a porta-potty as its only convenience.
Let me explain how I came to this radical decision.  It hasn't been a hasty one and, for a while, I wondered at my own lack of interest in finishing her. As a matter of fact if I had to do it all over again, would I have even picked this vessel (or at least this version of her) now that I live here?
In all honesty I haven't been real active as a boater in my new home. I have under my belt all of two trips on the local river. The nearest lift at Blue N Hall Marina is located on this river and is home to The McIntosh Rod and Gun Club, Proprietor Ashton Alford.   
I have a miserable showing of time on the rivers but am working to remedy this once I get the Mako so that it can be lifted.  The ramps here are rough, washed out and risky with the eight to nine foot tidal swing.  Using a lift is the way to go but the timing has to work out (these are tidal rivers). I have a few issues that I'm working out as I have accessorized it to the point that she's a little heavy and a little unbalanced in the lift.  The problem now is the stern eyes. They are too close together and too sensitive to the slightest imbalance.
Looking south from Belleville Point on Blackbeard Creek.


The two trips that crystallized my decision...
Trip one was with my daughter, wife and granddaughter, Addy.  It was at dead low tide to learn where the real channel lies in these rivers.  A nine foot tidal swing can make you think you are in the main channel, when it actually hugs the bank.  The water can go from deep to skinny in a matter of yards and the tides can make fifty yard wide rivers disappear twice a day. The Georgia coastal rivers are very different.  They have strong currents and constantly change.  Chart plotters help but it changes too much to bank on it.  Best go out at low tide and learn.  Go to the intercoastal and venture out carefully I was told.  I heed their advice. I went back out a week ago (trip two) with my wife and Dad at high tide and windy.  Very different.  At the intercoastal it starting getting rough with the wind and water piling up and we ran back in.  You have to have visibility here.  You need to see where you are going as hazards abound.

Accessorized Mako Pro Skiff hangs in the lift at Blue N Hall.
It is not happy with those close stern eyes and more often than
not it wants to roll to port.  I plan to move the stern eyes
outboard.
My first trip out with only half of my daughter's family told me that we needed a bigger boat and Addy needed to be made ready.  Trip two's revelation regarding windy conditions and current tells me that I was not excited about the prospect of taking that boat out with the tall pilothouse sides subject to wind and so crammed with amenities she felt very small.


Belleville Point at sunset
(about 10 minutes north)


The problem with Addy now is that she was conceived in a wholly different place, mindset and for a completely different purpose.  I started out needing an "exploration" vessel for far off waters that are now at hand, literally minutes down the road.  I also intended to take those trips to the gulf and not the miles of wondrous tidal creeks of coastal Georgia.  I may have been kidding myself but the gulf seemed a place that wasn't nearly so dependent upon the kind of visibility and subject to the current that these rivers require and contain.  One thing that I am keenly aware of now is how hard it is to see out of that tall pilothouse.  I had already began to think about having to add cameras around the pilothouse.
Docking in the rivers here is something that will take me a while to master, maybe a long while.  Its never the same and the prospects of doing this out Addy was making me nervous.  At the time that I conceived Addy's usefulness, we needed a conveyance that would make the trip to those far shores worthwhile.  The intention was to put in and camp for 3 to 5 days at a stretch, maybe longer then travel back to Rome where we would plan the next trip.  Maybe this would be once a year, maybe twice.  It wasn't going to be used much but the plan was to make the most out of each trip.  Now, I could see that, in her present arrangement, she wouldn't get used at all.
Turning this over for the past month, and knowing that I must restart her because it was already such an investment, I have had a radical change of heart but, one that makes perfect sense for our lives now.  
We need room, protection from the sun, and at times the wind or bugs, and places to sit and relax. What would our outings look like now?  Day trips, picnics to Sapelo, occasional tossing in of a line for trout, photography and general nature watching.  We needed a family boat for the rivers. Addy was never built to go offshore so her life is in the protected rivers and there is plenty to see. However, she was built for cruising the intercoastal for days on end, anchoring and living aboard.  Now, we see a special overnight trip, once a year perhaps, to a local marina on the coast with an overnight stay in a hotel, but many weekend cruises for an hour or two.
Redwing 21 Launch version
The launch concept is the equivalent of our modern pontoon boats in form and function.  Lets face it, pontoons are popular for a reason, they are just fun.  I see Addy turning heads and actually getting used in this role much, much more often.
Addy's hull with her full keel, swept bow, flat stable bottom that draws little water and roominess is a perfect platform. Karl Stambaugh actually includes several versions of a Redwing launch in his plans.  Her present massive pilothouse with shower, galley, toilet, berths and storage is not.  I turn back to the classic launch.  The quintessential  river touring boat for large parties with the purpose of sightseeing and entertainment.  These were slow, stable vessels that served as platforms for picnics, entertainment  and sightseeing .  Many of them were electric powered for the quietness it provides.  I will ditch the amenities for live-aboard use that sacrificed so much room.  A full length awning with curtains that can be lowered is an important feature.
Simplicity is the new watchword! 
Duffy Boats Launch as a sample of what is planned.
Craigslist will soon see a new self-contained head, galley burner/sink and Webasto AC unit among other creature comforts posted in the Brunswick classifieds. Off with the pilothouse and cabin.  The decks will be cut an even 9" all around and mahogany will be used extensively. Why? because a launch is the perfect canvas for those Victorian or Georgian touches. It is my intention to deck over with bright finished mahogany in the old mahogany runabout style.  The elevated cockpit will remain and will serve as the helm with a wrap around elevated backrest that ties into the mahogany coaming that surrounds the opened seating arrangement. The main seating will be set lower and arranged in a "U" shape that wraps both sides and the bow.  The boat will be driven seated from an elevated helm, and from the rear, so that the captain can be part of the party and conversation with a great view of the boat, guests and the intended course.  If the single high thrust kicker looks to be under-powered, I'll trade up.  If the keel seems to make her too hard to turn, I may add a bow thruster.

So, take one last look. She begins a metamorphosis soon (via reciprocating saw)... and I am excited about her again.

Sunday, September 25, 2016

The "Gilded Girl" is on the trailer and here's why...

Big Changes coming (here) and a warning of a possible lull in progress...

Miss Addy sits on here trailer and its not to run down to the local lake.  The news is that I have been moved to the coast, Savannah, GA to be exact.  After four years of an increasingly hectic schedule of traveling two to three days a week from Atlanta to Savannah to handle projects, my company has decided that it makes more sense to make Savannah our permanent home.  The sad part of this is that my Dad will have to now make the trip to help me finish it up.  I don't know if that makes him that sad, he loves the coast, but it does make it harder.  We will have guest accomdations ready for Mom and Dad anytime they are ready.  So the house here is on the market, we will head down next weekend on a house hunting trip, maybe get lucky and come back with a contract on one.  My temporary abode is the cheapest thing I can find (within reason) with travel back and forth on weekends.  So, it's down to two dogs and us.  The horses are at a new home, one that will take care of them and give them the chance to bloom out as I couldn't (like owning a race car and using it to get milk and bread once a year).  The tractor was sold and most of the shop resting in an assortment of flip top bins.  The boat shop is now empty and I will have Miss Addy shrink wrapped to protect her as we make the transition.

Getting ready to back the trailer under.  She is clear of the deck that
is ready to be removed so the trailer can back under.
Getting her from the shop floor to the trailer...

Luckily my Dad and brother were here to help.  My wife could hardly stand to watch and was sure it would be the the end of us all.  I saw Louis Sauzedde on the Jamestown site use jacks and blocking to get a big boat off its trailer. If you want to see how it's done and how we basically did it, go to their video series and watch.  Go slow and easy and over communicate!  The process was to support the transom, jack up and block the boat and gradually leapfrog the trailer cross members as you slowly back the boat under the boat.  We supported the transom at each end so at all times it was basically sitting on three points.  We basically had to reconfigure the trailer bunks so that there was one twelve foot bunk either side of the keel. So, off to the store for pressure treated 2" x 6" and outdoor carpet. We really aren't done with the bunks entirely and some adjustment will be necessary to get it perfect.  The foremost bunk attachments will need to be blocked up to match the rocker of the boat.  We also want to add a roller as the boat enters the trailer to start it up the keel.  Now that Miss Addy is on the trailer, we will drill for the bow and stern eyes.

So, stay tuned... 

It would be an incredible stroke of luck to find a shop ready to roll her in.  My next series of posts in this blog may be the building of a shop to continue her fitting out. I have a feeling that the project continues after I have built her a new home.

Things are a whirlwind and upside down. But, in the end, she will see the kind of use that she deserves cruising the Golden Isles of Georgia's Coast.

Picture taken at Pelican Point in Shellman Bluff, our intended target area for a home buy.


Now that she is on we can finally get a real look at her.  What a Beauty!