 |
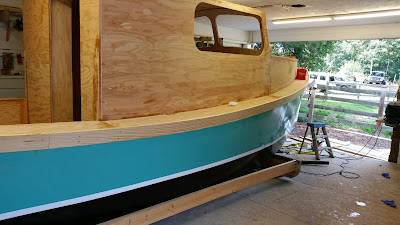
| 12' wide gap in the building. Next comes a ramp to pull the boat out on using skids (yet to be constructed). |
(and BTW, I cut a hole in my shop)
As you can see I have a large hole in the side of my boat shop. I'm not sure why I bring this up now, but its always worth noting when you cut away a large chunk of any structure. I knew it wouldn't be too long before we were ready to open this up to work on the roof and, well, the reciprocating saw was just sitting there so down she went.
 |
| Cardboard pattern laid out for final marking and transferring to 1/2" AB Fir Ply |
Again, hot glue gun and cardboard. It really doesn't take too much explanation so I'll gloss over some of what you see in this series of photos and let the captions do the rest of the talking. The procedure was to glue together enough cardboard to cover what the limits of a 4' x 8' sheet of ply will do. I made sure that I landed on a frame with my joints and simply marked under the ply with a pencil or Sharpie marker, flipped it and traced it out. To my surprise the pattern for the rear deck could be flipped along the centerline and used for both the Port and Starboard.
 |
| Port side shown upside down to be undercoated with epoxy before installing. |
 |
| Heavy ribbon of glue. Probably 12oz of epoxy plus silica and 4 tablespoons of milled fiber till its as thick as peanut butter. Not that greasy organic crap, thick like good old Jif! |
 |
| Roughed in pattern. Note that I have left the excised exterior wall rest where she fell. I am bad about this sort of thing. |
 |
| Solid pine breasthook let in and planed to curve of deck. |
 |
| Ply deck installed over breasthook. |
Sheer Strake
 |
| Stagger the boards back the distance you want the scarf. The strake will be 4" or so wide so the scarf is 8" long. |
To build these we need to join our 12' stock together to give us around 25 total feet of 1" x 5" once we split the 1" x 10" rough sawn stock. We are using pine again, very dense and resinous. We join through the use of a long glue joint at a very low angle. The power planer does a good job of hogging a lot of wood using some general guidelines. It is pretty straightforward as you just step the stock back and let the planer run across the board's edges as it slowly creates flats.
You can see the layout guidelines penciled in and the formation of the scarf joint.
Final joint should be close enough for epoxy to work it's magic. Remember that a little gap here works wonders with epoxy, it is actually preferable to a super tight joint.
You have an idea of the total length. It eats up all of the shop, plus a little. The joints are glued up using black poly plastic pieces to protect the backer blocks. The board was split then planed to 3/4". Do this after the glue up so that the planer takes out any inconsistency in the scarf joint and they will look perfect.
Installing them (get your clamps ready and maybe a car jack)
Prep the hull. We used epoxy to glue this in and so need to peel off the paint so we can get a good bond to the underlying glass. It was really just the last step in flushing the edge of the deck and holding the belt sander at waist height and sighting down along the hull, was pretty easy to get a good flush edge. If there were gaps, the epoxy would fill those in as we faired the deck joints.
The final photos don't say much about what it took to get these suckers in. We started in the middle, gluing our way back about six feet each way as we neared the ends. That is where it got tough. We used a combination of clamps, jacks and brute force to follow that sweeping sheer. It was tough but the results are worth it. The sheer strake really accentuates the sweep of the hull that gives this hull such grace for a hard chined vessel.
 |
| Sweep shows elegantly... |
 |
| Nice joint. Hard to tell but the epoxy is clear and filling what looks to be a dip along the face. |
The final step to finish this out is to plane and sand the sheer strake flush with the deck. Then a round over bit so that the Xynole fabric can round the deck and tuck neatly behind a future sheer cap.
Circling back to the hole in the wall...
It was time to make this thing mobile and I'll end this post with this project. We need to finish the roof and there is no room. The only way is to skid it out past the wall.
So two things needed to be done: 1) build skids and get the old cradle out from under the boat and 2) build a ramp to get the boat out 16 or so feet.
The skids were cut to fit the rocker from doubled up 2" x 12"s nailed together and carpeted on top. I also used some old 1/4" cutting board material HDPE from a leather cut table and heated the bends on the bottom and nailed them in place. We jacked up the boat and slid them under without a hitch.


 |
| Just a pretty simple deck to skid out on. I'll use the tractor to do it. |


No comments:
Post a Comment